As DBA, I find comfort in the fact that almost everything in life is based on a relation model, so I decided to blog about using the Orca Database editor to design customized GUI’s for setup and deploy packages in Microsoft Visual Studio. Beware trying out this, could break the standard templates given by Microsoft and could make unwanted install’s , if you created unwanted installs try Microsoft FixIt (find it on google).
If you follow this Blog Clearly this shouldn’t occur,
Firstly Where to find the files we need to customize for our project?
In Visual Studio: 2010 - C:\Program Files (x86)\Microsoft Visual Studio 10.0\Common7\Tools\Deployment\VsdDialogs\1033
OR
Drive installed \Version of Microsoft \ THEN
\Common7\Tools\Deployment\VsdDialogs\1033
In the VsdDialogs you will notice a lot of folders e.g 1028 or 1031, this got to do with the language you installed visual studio with, 1033 is for English.
How to start your Customization?
Firstly make a copy of the file named “VsdCustomText1Dlg.wid” , then use your copy to edit so if you make any mistakes you can delete it without harm.
Open your Copy with Orca (File->open->Files of type (All Files)):
 Step 1:
Edit Table, ModuleDialog change the Attributes of
the columns e.g
Step 1:
Edit Table, ModuleDialog change the Attributes of
the columns e.g

Links with in Visual Studio, “Setup project -> Right click
on the setup project -> View User Interface -> then right click on start and add Dialog”


In the VsdDialogs you will notice a lot of folders e.g 1028 or 1031, this got to do with the language you installed visual studio with, 1033 is for English.
How to start your Customization?
Firstly make a copy of the file named “VsdCustomText1Dlg.wid” , then use your copy to edit so if you make any mistakes you can delete it without harm.
Open your Copy with Orca (File->open->Files of type (All Files)):

Step 2:
Edit Table ModuleConfiguration, and change the
following columns
 |
| Notes: Some values are hardcoded so it could be displayed on Visual Studio, e.g #1101 points to strings in Visual studio. Some are blank so that it isn’t Changeable by the user. |
Links to: Properties in User Interface -> Custom Dialog

Step 3:
Edit Table Property, change the following,
Step
4:
Edit Table TextStyle,

Step 5:Add a table named RadioButton, Right Click on tables
side -> add table ->Scroll then select RadioButton, Add contents,
| This graph determines the layout of your radio button’s, so this table links up with control table. |
Step 6:
Edit Table ModuleSubstitution,

Step 7: Edit Table ModuleSignature,
 |
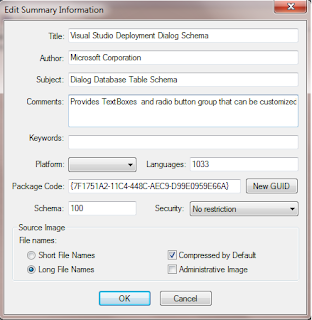
Highlight the previous one, press A4 then convert,
e.g {7F1751A2-11C4-448C-AEC9-D99E0959E66A} to 7F1751A2_11C4_448C_AEC9_D99E0959E66A Then edit Package code mention in step 1: Toolbar->View -> Edit Summary Information N.B must be the same. And it must be a new GUID. |
Step 8: Edit Table’s ModuleInstallUIInstall and ModuleInstallExecuteSequence

Step 9: Edit table Dialog,

Step 10:Edit Table CustomAction,

Step 11: Edit Table ControlEvent,

Step 12:Edit Table ControlCondition,
Step 13:Edit Control,
Step 14: The Rest of the tables is not important.
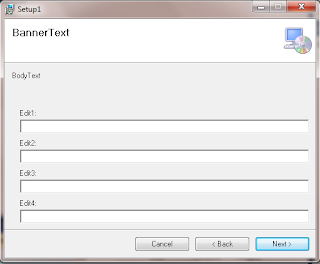
What have we created ?
Before:
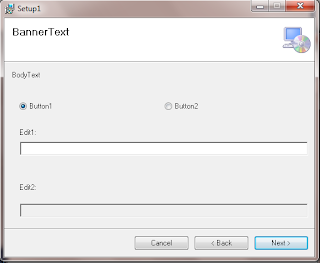
After: By clicking on Button2 radio button we enable Edit2 Textbox.


Step 9: Edit table Dialog,
Step 10:Edit Table CustomAction,

Step 11: Edit Table ControlEvent,

Step 12:Edit Table ControlCondition,
 |
Notes: This table relates to the ModuleSubstitution table the Condition value of the radio button relates to the property of the ModuleSubstitution. |
 |
| Notes: This table controls the total of the application layout |
Step 14: The Rest of the tables is not important.
What have we created ?
Before:

After: By clicking on Button2 radio button we enable Edit2 Textbox.

NOTES : The rest of the dev is done in C# so im not going to
explain a lot there, just add project output -> add custom actions ->

No Spaces between CustomActionData, /LOC is a Variable name,
also if the value of [EDITA1] has spaces then it must be like this
/PATH=”[EDITA2]”, [EDITA1] corresponds to the UI Edit1Property Value.
Example in your app:
C#: String MonitorLoc =this.Context.Parameters["PATH"];
Ideas:
You can take the graphical user interface of Setup and Deploy
Packages to the extreme with customized splash screens, ReadMe’s, Drop Down
Combo Boxes. Instead of trying to make a custom form to match your setup try
Converting the Templates..
References:
Very nice post! Worked with Orca before and its quite flexible for customizations. Personally I have the need to use the stock standard Setup project template and customize it using plain old win forms. Hopefully there's a better version of Orca out soon that makes it even more easier for customizations.
ReplyDeleteI've been looking for this for how many hours! Thanks!
ReplyDelete